> For the complete documentation index, see [llms.txt](https://help.join.com/llms.txt). Markdown versions of documentation pages are available by appending `.md` to page URLs; this page is available as [Markdown](https://help.join.com/create-and-manage-jobs/job-creation.md).

# Job creation

Create a job in Job Studio, from scratch or by importing an existing ad, set up its hiring team and application form, then review and publish it.

Create a job in JOIN with a guided flow, publish the job ad and start collecting applications.

You can start creating a job from multiple places in the JOIN interface:

1. **Sidebar menu**: Click the blue `Create job` button at the bottom of the left-hand menu.
2. **Dashboard**: Click `+` icon on the top-right of your JOIN Dashboard.
3. **Jobs tab**: Navigate to the `Jobs` tab from the sidebar. Each sub-tab (e.g. `Active`, `Drafts`, `Archived`) has a `Create job` button in the top-right corner. If you don’t have any jobs yet, you’ll also see a `Create job` button in the centre of these screens.

Clicking any of these `Create job` buttons will open the Job Studio.

**Job Studio** is JOIN's job creation and management experience. It takes care of every detail involved in building a job ad, from your input about the role through to the finished ad and its application form, and checks that the ad is ready before you publish: fit to go out across a selection of job boards, and free of language that could put candidates off or breach a board's policies.

When you create a job from scratch, it starts with a guided, step-by-step flow: you fill in the fields your job actually needs, and the flow adapts as you go. A remote job asks for a remote region or country, for example, while a hybrid job asks how many days are in the office versus at home, and where that office is.

{% hint style="info" %}
**Who can use this**

* **Plans:** All plans
* **Roles:** System Admins and Standard create jobs; Job Admins and Hiring Managers edit their jobs
  {% endhint %}

## Quick steps

1. Click `Create job`.
2. On the `Role details` screen, enter a `Job title`, or import an ad you already have.
3. Fill in each step of the flow and click `Continue`.
4. Check the generated ad on the `Preview` tab and click `Review`.
5. Fix any blocking issues, then click `Publish`.

## How job creation works

Creating a job ad has four phases:

{% stepper %}
{% step %}
**Choose how to start**

From scratch, or by importing an ad you already have.
{% endstep %}

{% step %}
**Fill in your job details**

A guided, step-by-step flow collects only the fields your job needs, job title, workplace, contract, compensation, benefits, hiring team, pipeline, and application form.
{% endstep %}

{% step %}
**Preview and review**

See the AI-generated ad, make changes yourself or ask AI to, and let JOIN check it for issues. Check any role details that you'd like to review or edit. View how the job ad will look to the applicants.
{% endstep %}

{% step %}
**Publish**

Your ad goes live and is automatically posted across a selection of job boards.
{% endstep %}
{% endstepper %}

Once you've entered a job title, each `Continue` saves your progress as a draft, so you can leave and continue working on it later. Answers on the step you're on are lost if you leave before clicking `Continue`.

***

## Choose how to start

You always start on the `Role details` screen, the first step of the guided flow. From there, choose:

{% tabs %}
{% tab title="Start from scratch" %}
Fill in `Job title` and the rest of the fields on this screen yourself, then continue step by step through the flow, only the fields your specific job needs. A remote role asks for a region or country, for example, while a hybrid role asks for an office and an in-office schedule, so you'll only ever see what applies to the job you're creating.

Once you've completed every step, Job Studio's in-built AI generates a full job ad from what you entered. From there you can ask AI to adjust any part of it, edit the text yourself, or go back to any earlier step in the flow to change a setting, before you review and publish.

<figure><img src="https://1825767176-files.gitbook.io/~/files/v0/b/gitbook-x-prod.appspot.com/o/spaces%2FEdFjOFlkC1DEfDv3nGRh%2Fuploads%2FAdYW0la0NJs4OcQfLrA0%2Fcreating-job-from-scratch.gif?alt=media&#x26;token=1406bd17-ac1b-4676-a417-beca03e5e0f1" alt=""><figcaption><p>Step-by-step job creation flow</p></figcaption></figure>
{% endtab %}

{% tab title="Import job ad" %}
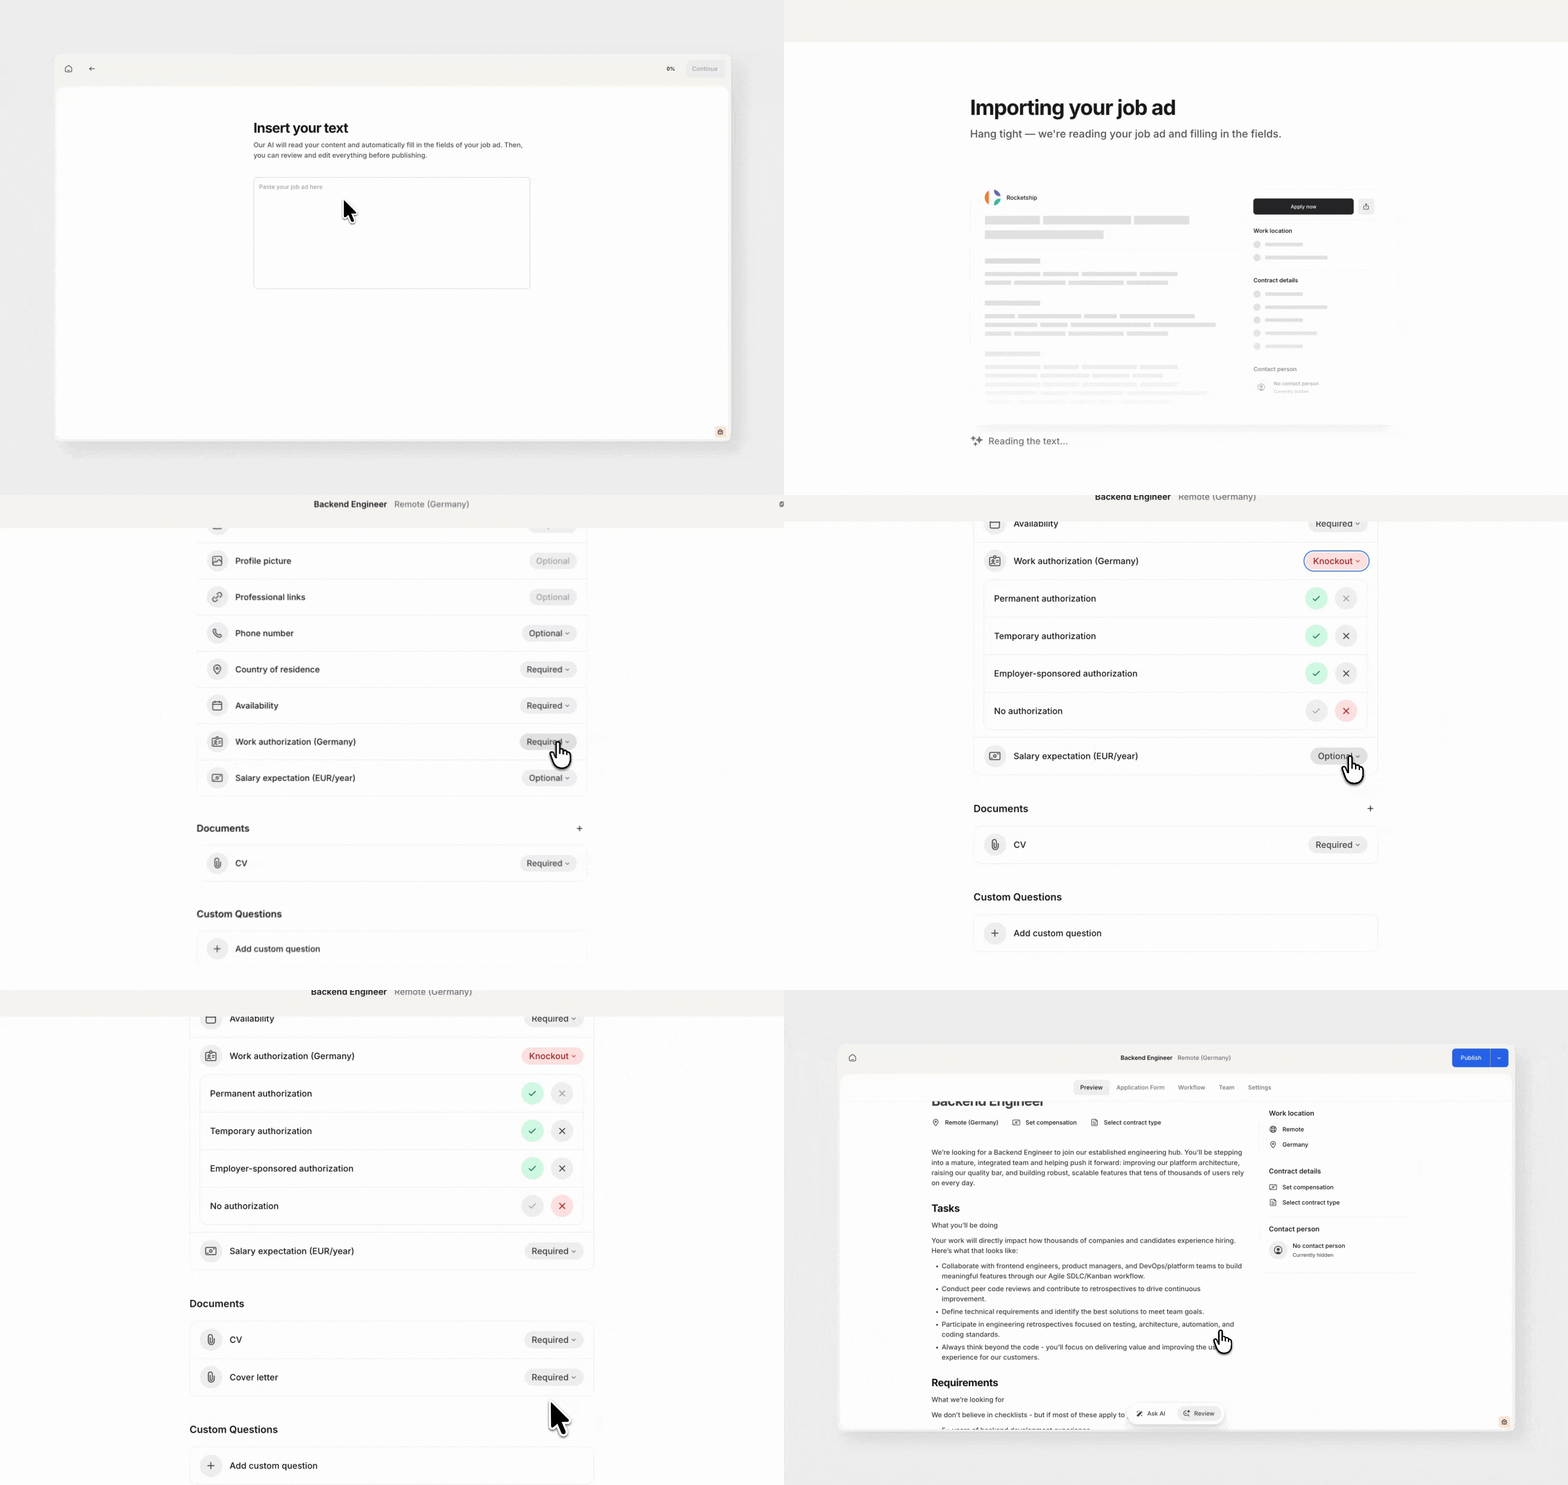
Click `Import` on the `Import job ad` card.

In the `Paste text` option, paste copy of an existing job ad you already have (minimum 200 characters are needed) and click `Continue`.

If your pasted content is too short or doesn't look like a job ad, you'll get a message asking you to add more.

JOIN's AI reads the text, writes the ad description, and fills in as many other fields as it can, mainly the job title and, where the text states it clearly, things like location and contract type.

It then takes you to the `Application form` step, skipping the other detail steps. If it couldn't find the job location, it shows you the workplace step first. There, you can already start adding the screening questions, knockout questions, and documents you want to collect from candidates, see [Application form](#application-form) below for how those work.

<figure><img src="https://1825767176-files.gitbook.io/~/files/v0/b/gitbook-x-prod.appspot.com/o/spaces%2FEdFjOFlkC1DEfDv3nGRh%2Fuploads%2FfYjMdIjnaoONfBn5u16y%2Fimport-job-from-text..gif?alt=media&#x26;token=e5fae59f-3b7b-4619-9409-746e009c7575" alt=""><figcaption></figcaption></figure>

{% hint style="warning" %}
Nothing publishes until **every required field** across the job is filled in, so go back through the flow's steps and check anything the import couldn't fill in before you continue to publish.
{% endhint %}
{% endtab %}
{% endtabs %}

***

## Role details

### Job title

Enter the title for the role.

This is a free-text field. This is the only required field on this screen, it's also what creates your job as a draft, so from here on your progress saves automatically after every step.

### Language

Choose the language your job ad is written and displayed in.

The workplace, contract, and compensation details on the public ad and in preview mode follow this setting, your own JOIN interface stays in your account's language regardless of the language you select here.

Job Studio currently supports one language per job, so if you need the same role advertised in more than one language, create a separate job ad for each.

### Priority

Set an internal priority to `Low`, `Medium`, `High`, or `Urgent`, to help your team organise their hiring efforts. By default, this is set to `Medium` priority.

This doesn't change anything on the public ad, it's for your own use: it adds a `Priority` column you can use as filter, and sort by on your `Active` jobs list, so you can tell at a glance which roles need attention first.

### Number of openings

Specify how many identical openings you're hiring for under this one job ad.

This is useful when you need several people for exactly the same role, for example five seasonal roles under one "Summer Restaurant Help" ad, rather than creating five separate job ads.

<figure><img src="https://1825767176-files.gitbook.io/~/files/v0/b/gitbook-x-prod.appspot.com/o/spaces%2FEdFjOFlkC1DEfDv3nGRh%2Fuploads%2FPmOZnSG18znDnYB6KKsg%2Fjob-role-details.png?alt=media&#x26;token=d1889997-522e-44e8-a44a-6573d7b410f7" alt=""><figcaption></figcaption></figure>

***

## Workplace model and location

Set the workplace model and location for this role. These settings determine where employees work and which employment terms are available.

The location you choose here matters beyond the job ad: it sets the currency and salary benchmarks used later in `Compensation` step, and determines which `Contract types` are available in the next step.

Choose the option that best matches the role:

### On-site

Choose this option if the role requires working onsite from a specific company location. You can [pick from the locations](https://join.com/settings/locations) already added to your account. If you have not added that location already, you can add new from the option available.

<figure><img src="https://1825767176-files.gitbook.io/~/files/v0/b/gitbook-x-prod.appspot.com/o/spaces%2FEdFjOFlkC1DEfDv3nGRh%2Fuploads%2FxjzjwC4fizTkSjoFuZVx%2Fon-site.gif?alt=media&#x26;token=422067cc-f489-47d3-a135-5c5063fdfea7" alt=""><figcaption></figcaption></figure>

### Hybrid

Select this option if your role will have a flexible job model where employees split their time between working in a physical office and working remotely from home or another location.

When you click `Continue`, you can:

1. Choose the primary office location or add a new location.
2. Set an in-office policy: a flexible number of days each week or fixed days. For fixed days, select the days of the week on which the employees work in the office.

<figure><img src="https://1825767176-files.gitbook.io/~/files/v0/b/gitbook-x-prod.appspot.com/o/spaces%2FEdFjOFlkC1DEfDv3nGRh%2Fuploads%2F0LWN6TMYdwPpJt0pWaYZ%2Fhybrid-work.gif?alt=media&#x26;token=732dc2ab-fc91-4289-81dd-dae11afd9f61" alt=""><figcaption></figcaption></figure>

### Remote

Choose this option if employees work remotely and do not have a fixed company office.

<figure><img src="https://1825767176-files.gitbook.io/~/files/v0/b/gitbook-x-prod.appspot.com/o/spaces%2FEdFjOFlkC1DEfDv3nGRh%2Fuploads%2FQMNaNIr9BS0R64ml1dvl%2Fremote-work.png?alt=media&#x26;token=ed3699cf-a0b3-433d-a692-2242c454a47f" alt="Remote workplace model option in the job creation flow"><figcaption></figcaption></figure>

When you click `Continue`, choose where employees can work:

1. Select `Worldwide` if employees can work from any country.
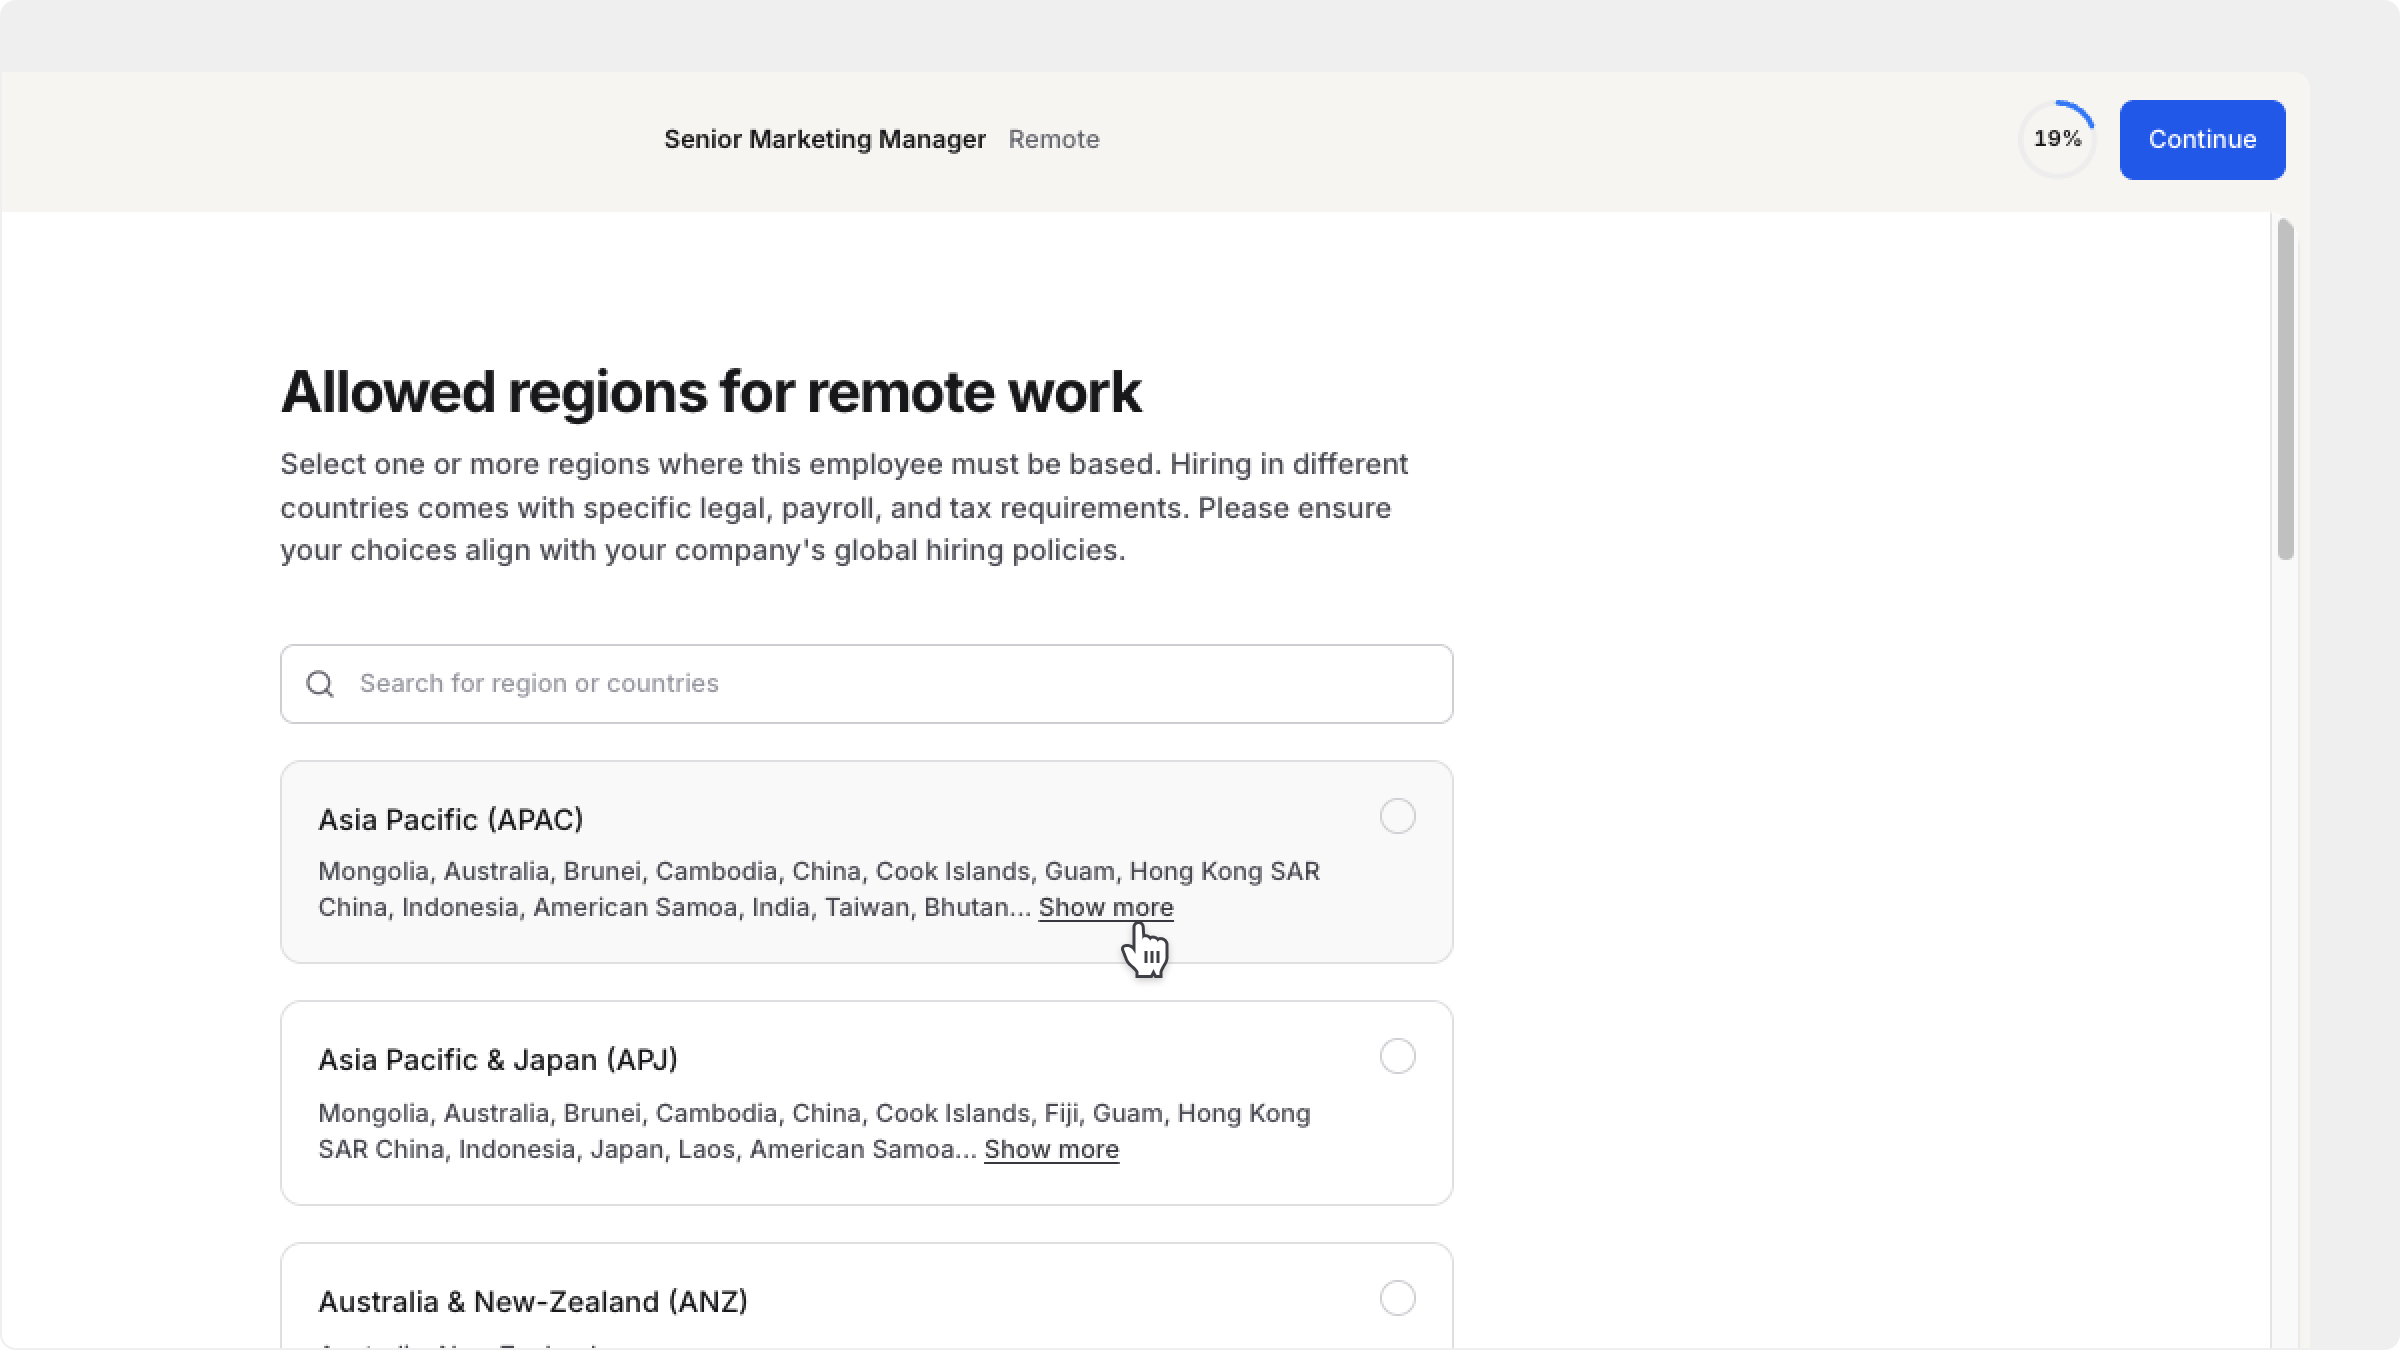
2. Select `Region` to choose a group of countries, such as EMEA, APAC, DACH, etc.

<figure><img src="https://1825767176-files.gitbook.io/~/files/v0/b/gitbook-x-prod.appspot.com/o/spaces%2FEdFjOFlkC1DEfDv3nGRh%2Fuploads%2FOSuVYkhXhmppPloqRWjf%2Fremote-work-region.png?alt=media&#x26;token=ecd9b074-d932-449b-ad3b-8208ca782034" alt="Country selection for a remote role"><figcaption></figcaption></figure>

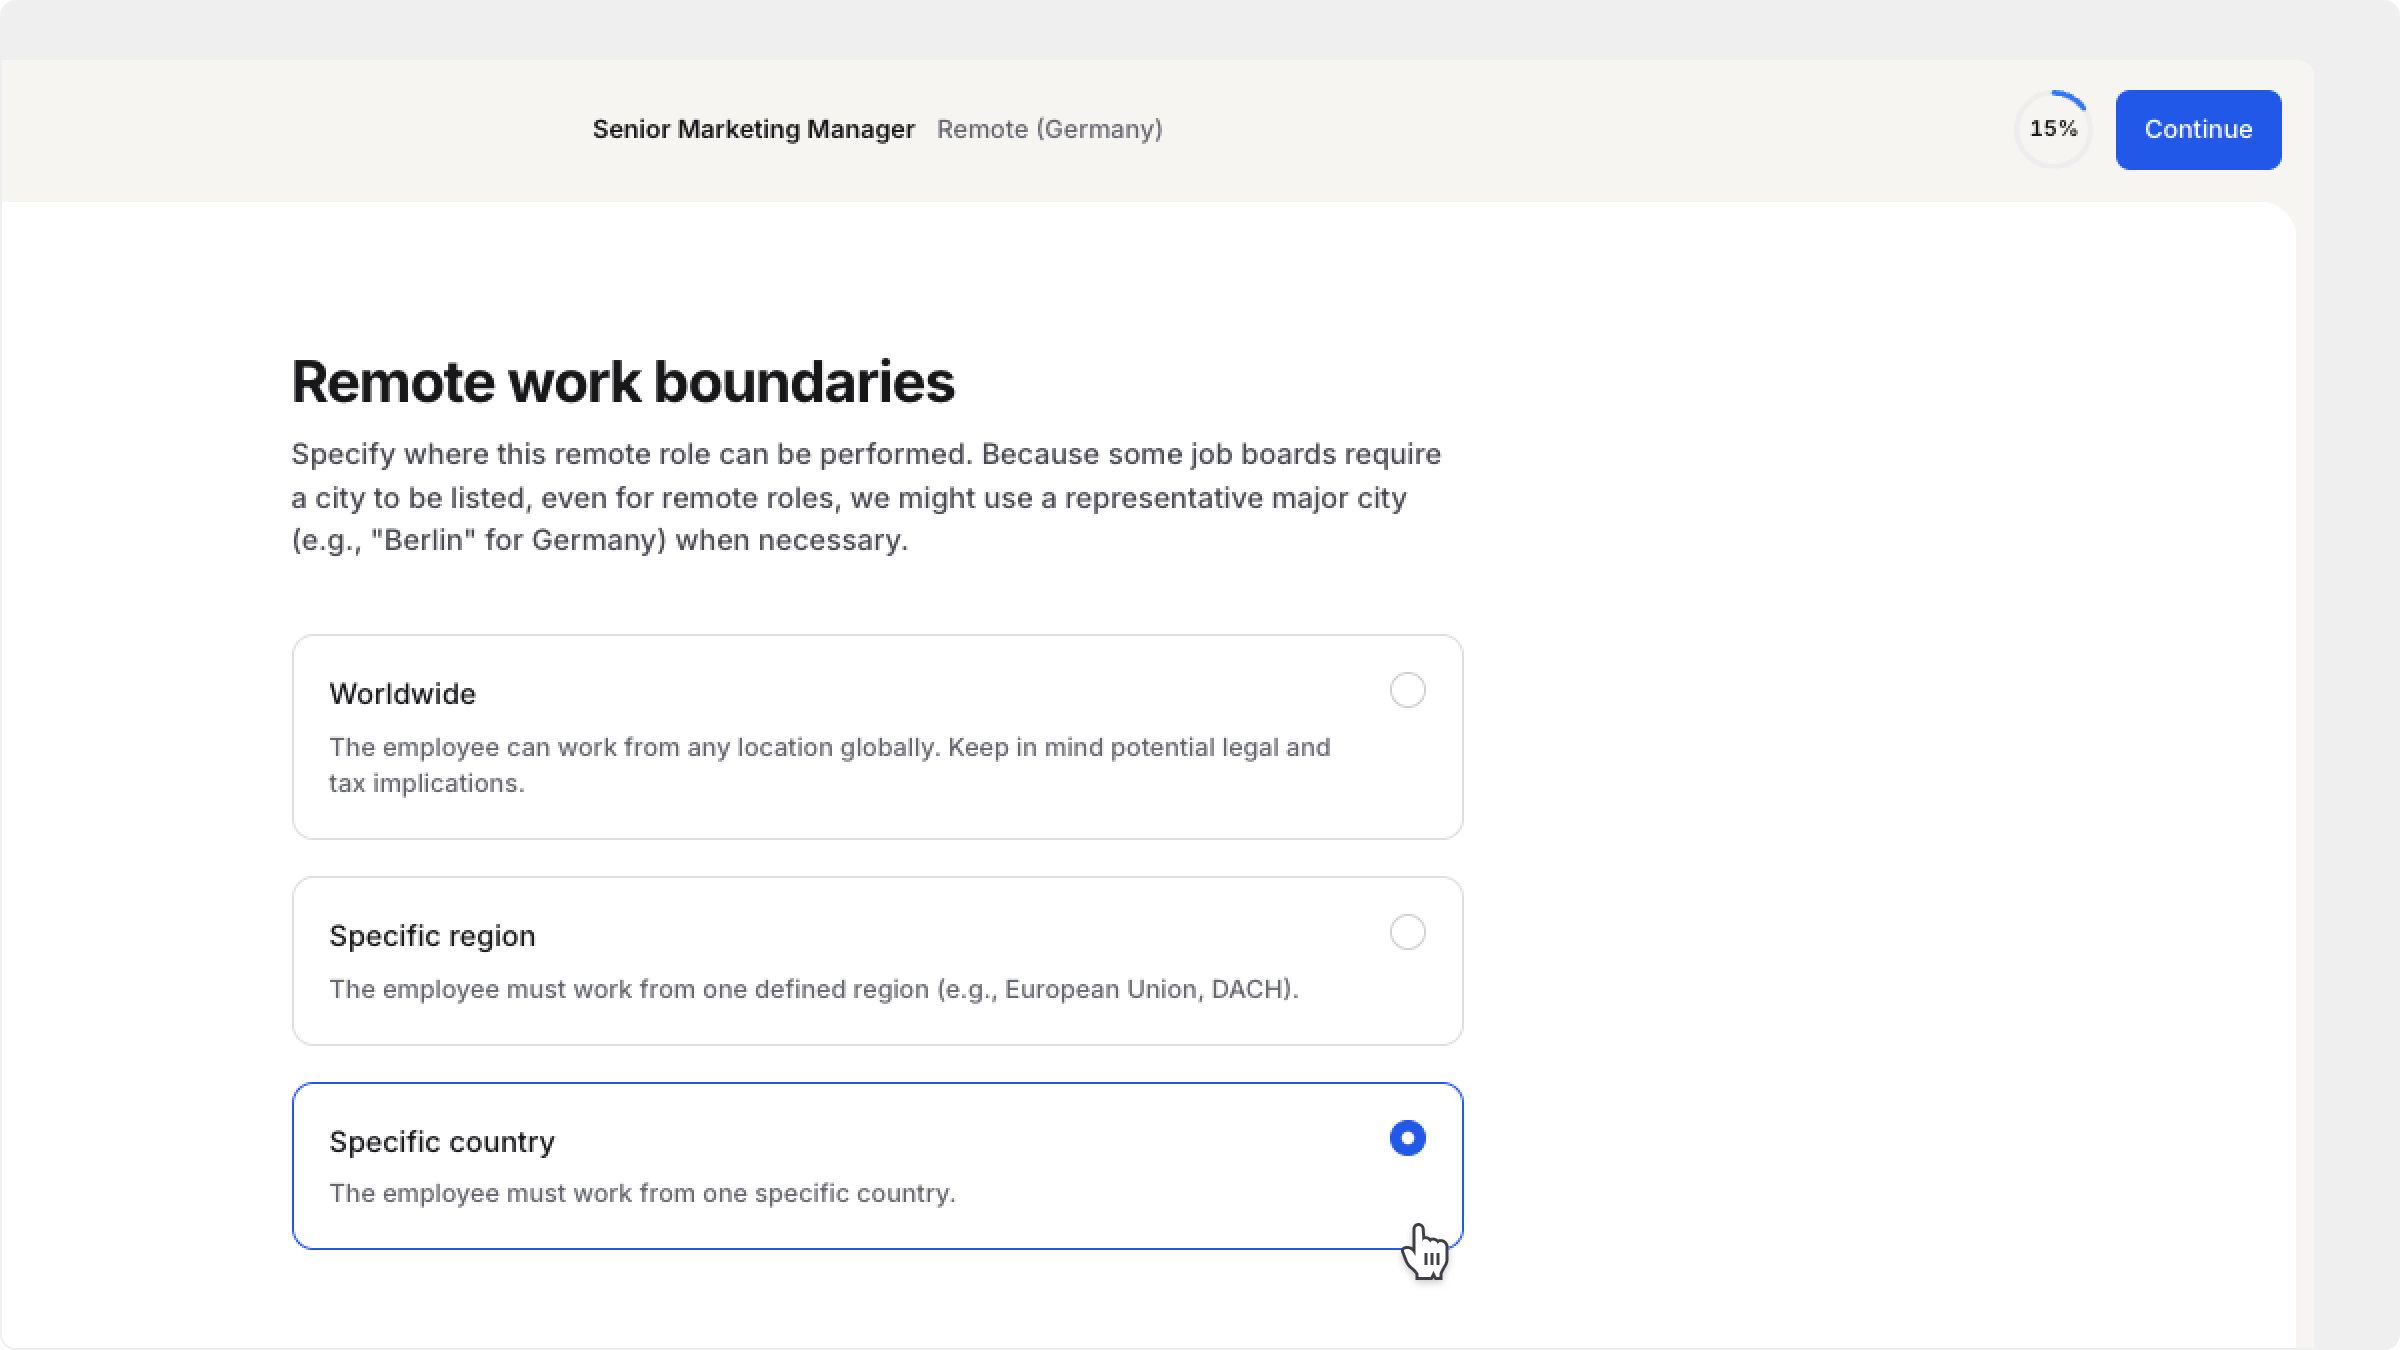
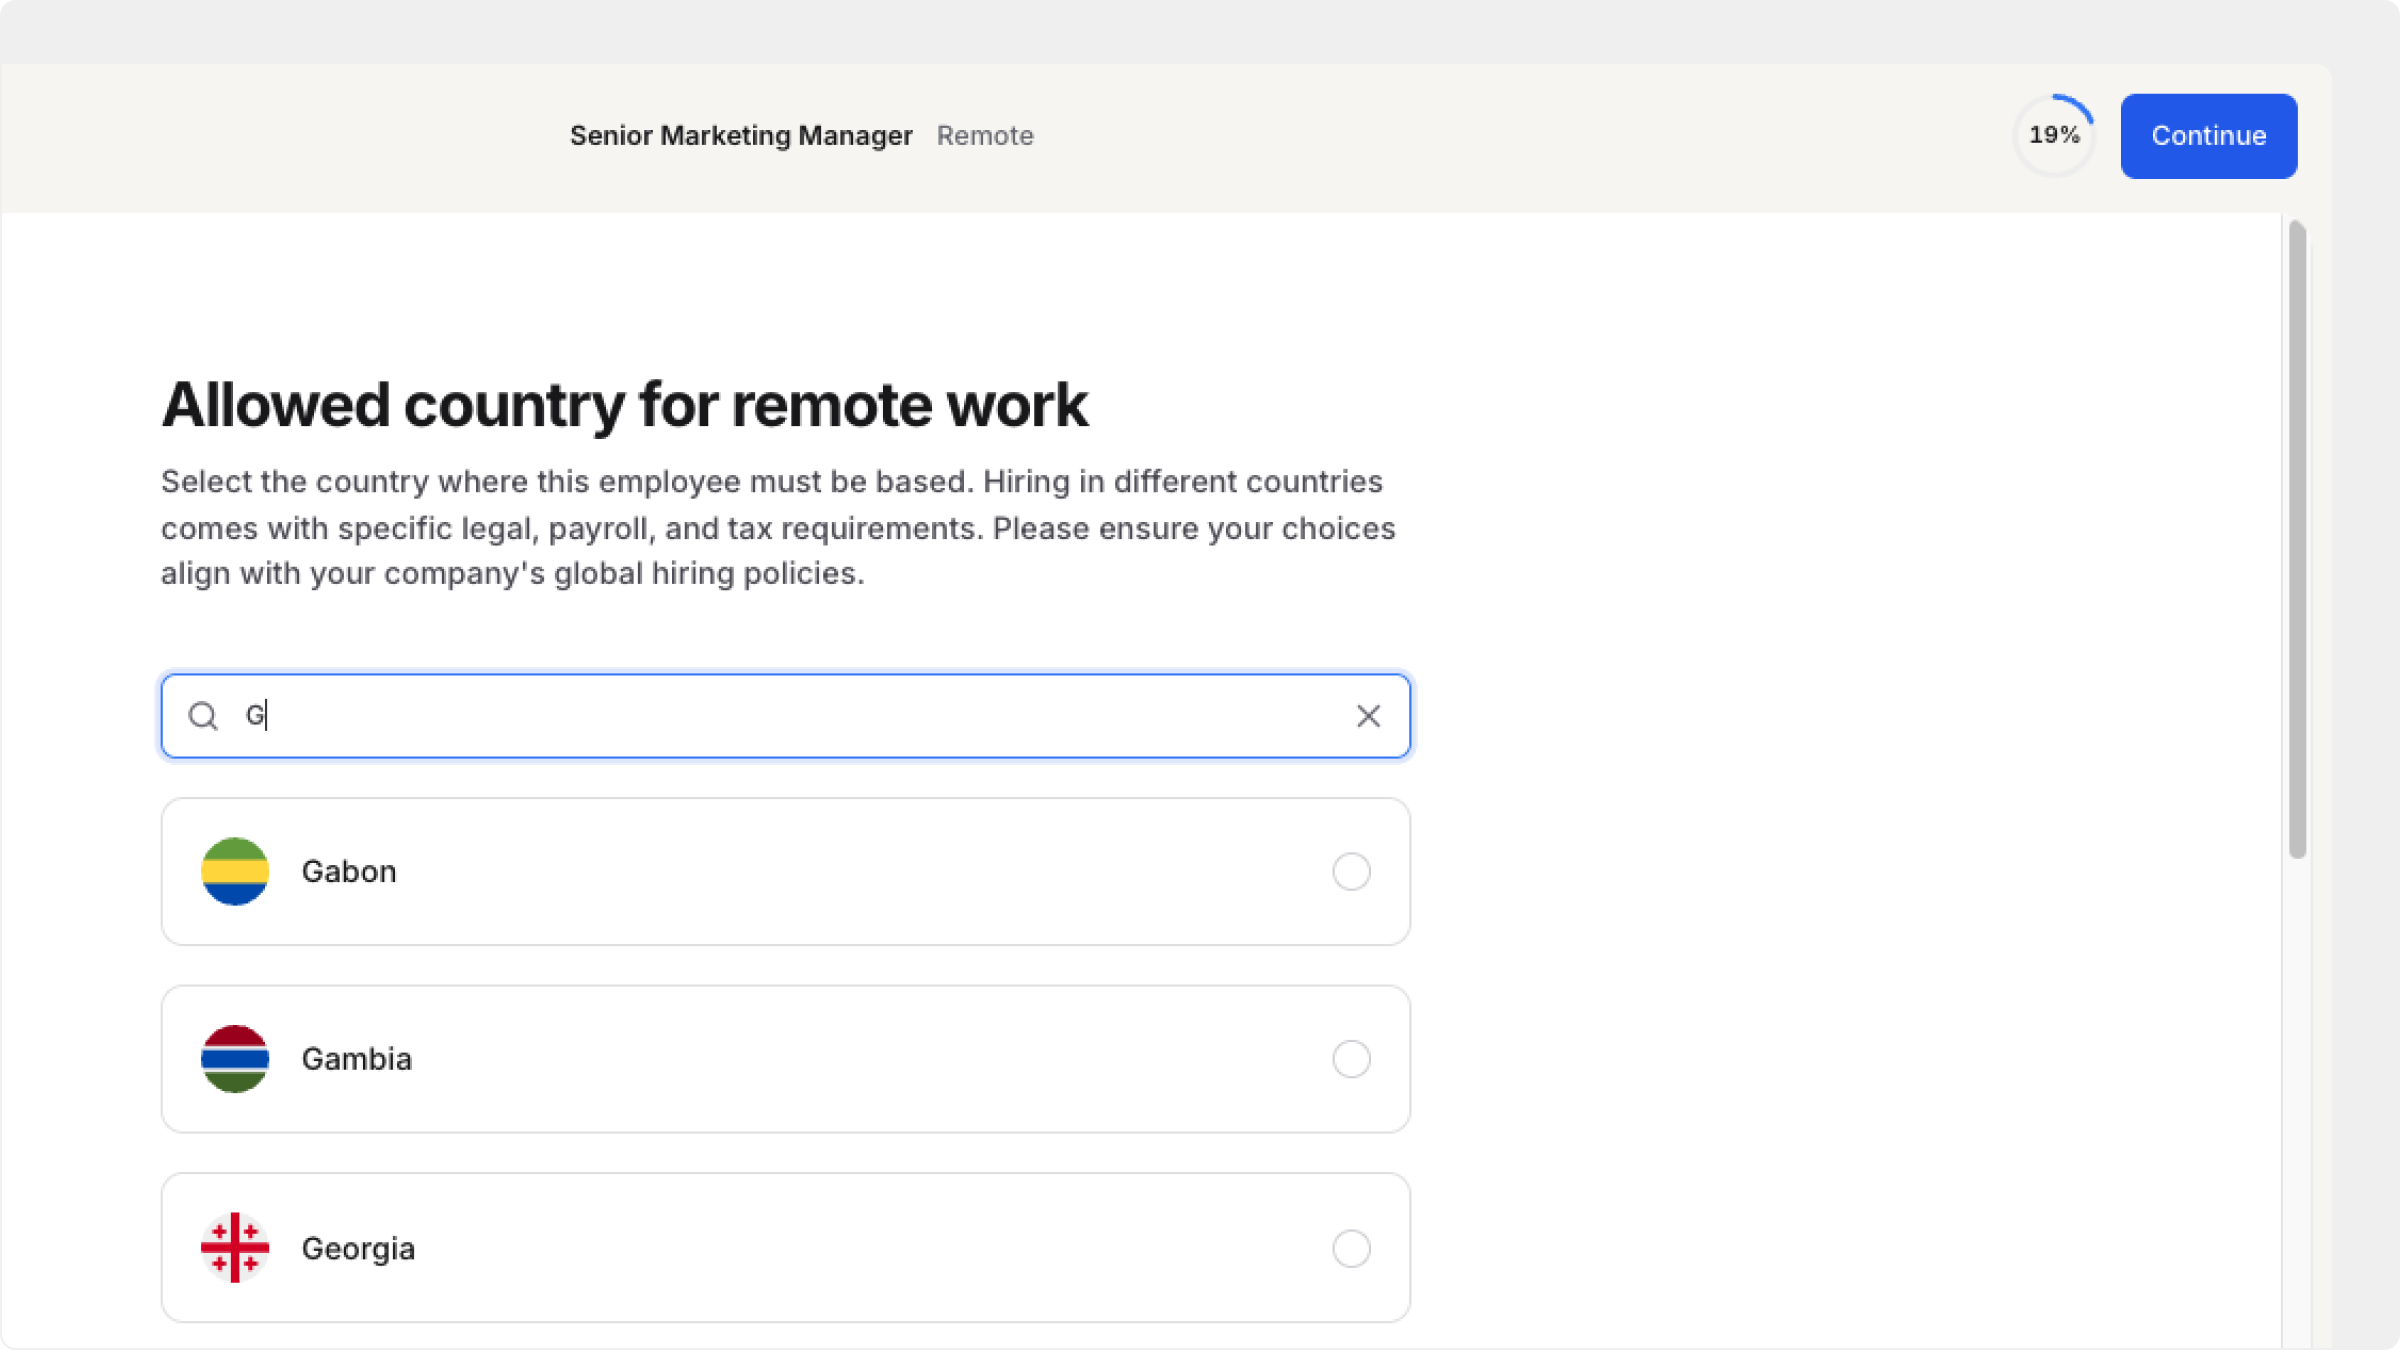
3. Select `Country` to restrict the role to one country.

<figure><img src="https://1825767176-files.gitbook.io/~/files/v0/b/gitbook-x-prod.appspot.com/o/spaces%2FEdFjOFlkC1DEfDv3nGRh%2Fuploads%2FyhZ0gQQ8Spqi30j04jqy%2Fremote-work-country.png?alt=media&#x26;token=01fe011e-0f1c-41b6-8e8e-f5c0fa00a9ea" alt="Remote location options for worldwide, regional, and country-based roles"><figcaption></figcaption></figure>

***

## Contract type and employment terms

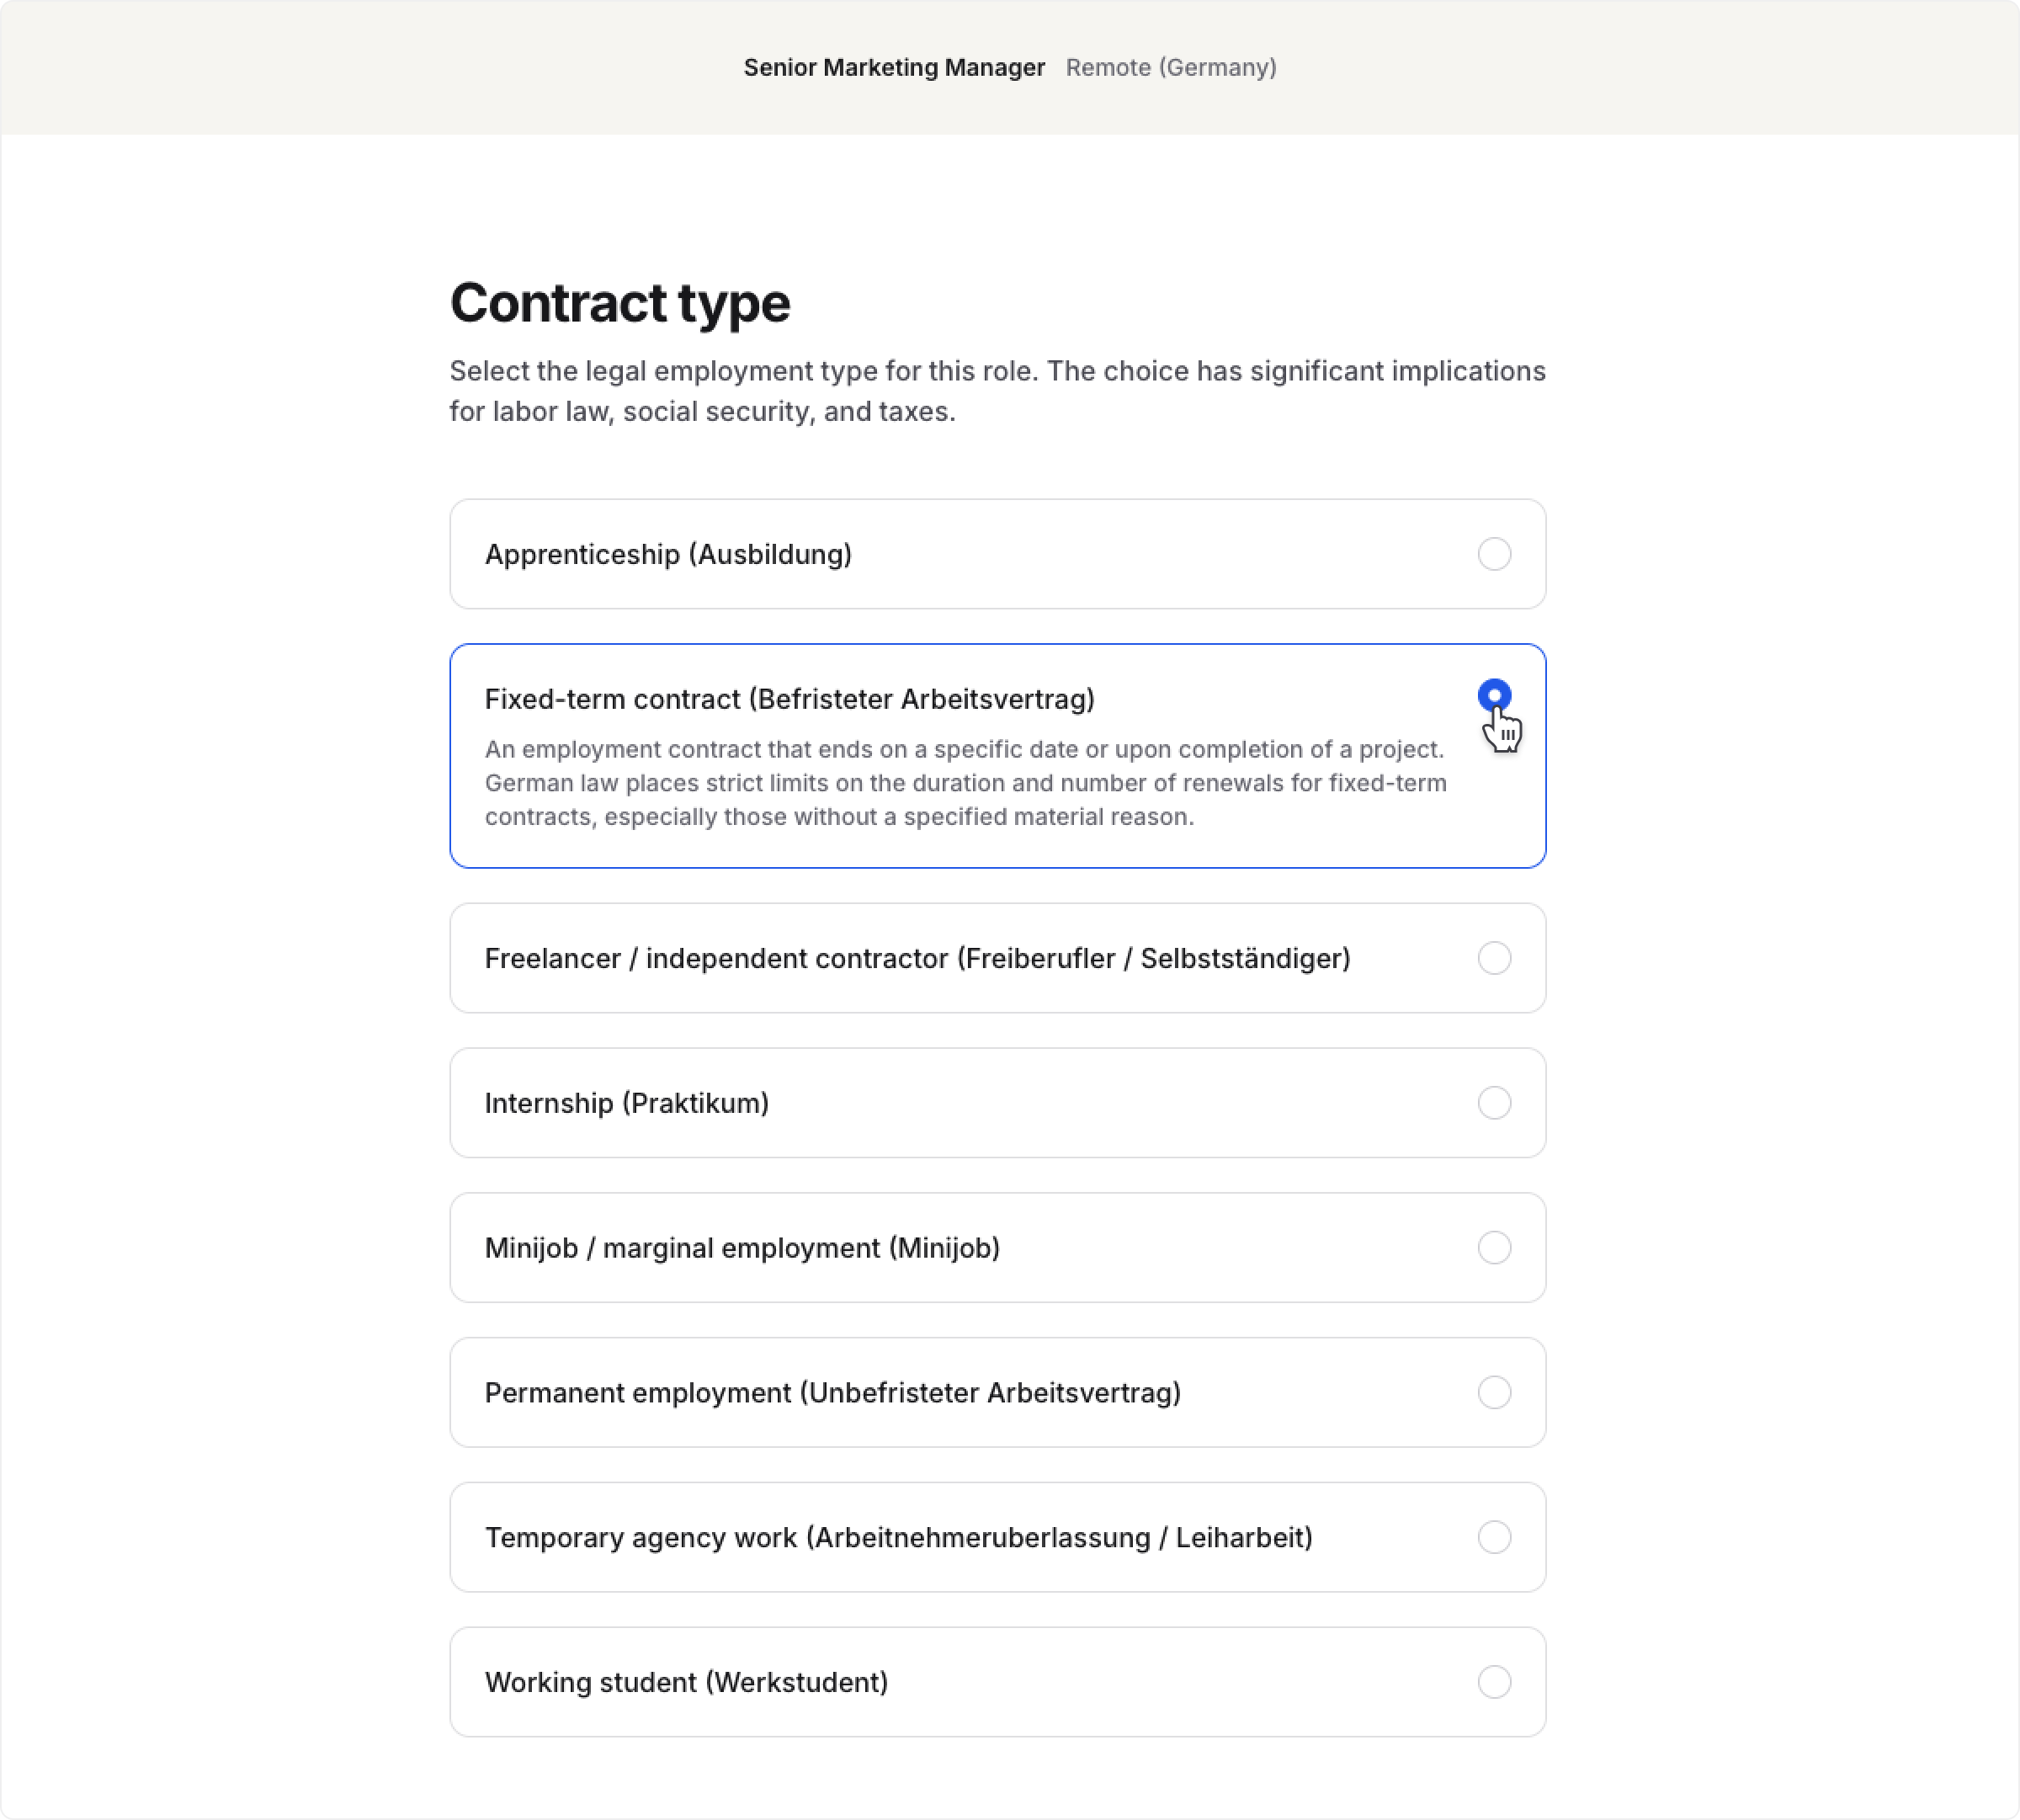
Pick a `Contract type` from the list available for the country you selected (or a generic option for worldwide or regional remote jobs).

<figure><img src="https://1825767176-files.gitbook.io/~/files/v0/b/gitbook-x-prod.appspot.com/o/spaces%2FEdFjOFlkC1DEfDv3nGRh%2Fuploads%2FIeuvP6w1LRkYiEYjXOCo%2Fcontract-type-germany.png?alt=media&#x26;token=8e988290-c938-4bd2-a08f-4033891bfa15" alt=""><figcaption></figcaption></figure>

Job Studio pre-fills the employment terms below with your country's usual defaults for your selected contract type.

Finalise the following details to specify the terms of your employment:

* `Start date` : Leave it as "As soon as possible" or pick a date from the calendar
* `Contract Duration` : Fill in the total length of employment in number of months if the contract isn't unlimited
* `Probation period` : Specify the length of trial period (in number of months) for the new employee
* `Weekly working hours` : Define the standard number of working hours per week for this role
* `Annual vacation days` : Enter the number of paid vacation days provided annually

<figure><img src="https://1825767176-files.gitbook.io/~/files/v0/b/gitbook-x-prod.appspot.com/o/spaces%2FEdFjOFlkC1DEfDv3nGRh%2Fuploads%2FSyhUzZHBBBayVq9Uoqde%2Femployment-terms.png?alt=media&#x26;token=a9a576cb-c03e-4005-989b-d51a44d14c59" alt=""><figcaption></figcaption></figure>

***

## Compensation

Under `Base compensation`, Job Studio's AI pre-fills a `Salary range` for you automatically, based on market data for the job title, location, contract type, weekly working hours and currency. While it's calculating, you'll see a short `Loading market data` indicator, once it's done, edit the `Minimum` and `Maximum` amounts directly if you want to adjust them.

You can also:

* Switch the `Salary range` toggle to a fixed amount instead
* Change the pay period (e.g. `Yearly`) and `Currency`

Under `Visibility on the job ad`, choose:

* `Public`: candidates can see the salary range on the job ad
* `Hidden`: compensation is hidden from the ad and only visible internally

<figure><img src="https://1825767176-files.gitbook.io/~/files/v0/b/gitbook-x-prod.appspot.com/o/spaces%2FEdFjOFlkC1DEfDv3nGRh%2Fuploads%2Fdj3uOZyNIhSM5L4oSDbh%2Fcompensation.png?alt=media&amp;token=f9fa32cb-af1a-454d-9170-138fa089fdcf" alt=""><figcaption></figcaption></figure>

{% hint style="warning" %}
In countries with mandatory salary disclosure laws (Austria, Slovakia, Latvia, Lithuania), `Hidden` isn't available and a salary (a fixed amount or a range) is required. In other EU countries, choosing `Hidden` shows a reminder that EU pay transparency rules may still require sharing salary details with candidates later in the process.
{% endhint %}

***

## Benefits

Select which of your company's benefits apply to this role, grouped by category (for example `Health & Wellness`, `Financial & Retirement`). Benefits are managed centrally for your company, if the one you need isn't listed, add it in `Settings` first.

***

## Hiring team

Assign specific team members who will help manage the job and its candidates.

### Team members

Use the `Team members` dropdown to add colleagues who should have access to this job and its candidates. Each selected person will be listed under the `Hiring team` section.

You can assign different roles to each team member i.e. `Job Admin`, `Reviewer`, or `Hiring Manager`, depending on the level of access you want them to have. See [Hiring team](/create-and-manage-jobs/hiring-team.md) for what each role can do.

Only users who have already been added to your JOIN account will be available for selection here. You can’t invite new users from this step — to do that, head over to your account [Settings](https://join.com/settings/team) first.

Click `Compare job roles` next to the dropdown to learn more about what each role can do.

### Contact person

Choose one person from your hiring team to appear as the contact person in the published job ad. This person will:

* Be displayed publicly on the job ad
* Receive notifications when new applications come in
* Be available for candidate questions (by email, though their address is not shown)

You can select the contact person using the `Contact person` dropdown.

***

## Workflow

In this section, you can define how applications will be managed for this job after you receive candidates.

Choose a hiring [pipeline template](#user-content-fn-1)[^1] from the dropdown. If you do not select one, JOIN uses your account's default pipeline. Hover over a template to preview its stages. A bolt icon marks stages with automation.

Selecting a template assigns it only to this job. To create or edit a template, go to `Settings` and select `Pipelines` under `Templates`.

<figure><img src="https://1825767176-files.gitbook.io/~/files/v0/b/gitbook-x-prod.appspot.com/o/spaces%2FEdFjOFlkC1DEfDv3nGRh%2Fuploads%2FuFxFi4KZCtjSdNWtgVw4%2Fworkflow-pipeline-jobs.png?alt=media&amp;token=ccebf2a8-1e9e-4c0c-9c84-dfc36f9d9b65" alt=""><figcaption></figcaption></figure>

### Pipeline template

You can select a pipeline template from the dropdown menu. Any pipeline template that has been previously created and saved in `Settings` > `Pipelines` will appear here.

If you'd like to create a pipeline template specific for your role, then you can go to [Pipelines](https://join.com/settings/pipeline-templates) and click on `Add template` button on the top-right.

[Read more about setting up pipelines and automations](/review-candidates/pipeline-management.md)

***

## Application form

This step of job creation helps you customise the application form to collect the right information from candidates during the job application process. These settings help you manage expectations upfront and collect the level of detail you need to assess each candidate.

You can choose the question type to define how each field in the application form behaves by selecting one of the following types:

* `Optional`: The candidate can skip the question
* `Required`: The candidate must answer the question
* `Knockout`: The application is automatically rejected if the answer does not meet your criteria

<figure><img src="https://1825767176-files.gitbook.io/~/files/v0/b/gitbook-x-prod.appspot.com/o/spaces%2FEdFjOFlkC1DEfDv3nGRh%2Fuploads%2FsmqnrufzGXZGYSMYHeYZ%2Fscreening-questions.png?alt=media&amp;token=8543983f-d2b5-42a3-8e8d-51eac8a515e0" alt=""><figcaption></figcaption></figure>

### Personal information

`Full name` and `Email address` are always required. For the rest, you choose whether each is `Required`, `Optional`, or (for some) a `Knockout` question that can automatically reject candidates who don't meet it:

* Profile picture, professional links (always optional)
* Phone number, country of residence
* Availability
* Work authorisation for the job's country (hidden for worldwide or regional remote jobs)
* Salary expectations

### Documents

Define which documents applicants need to submit when applying :

* `CV`: Choose from `Required` or `Optional`. CV is required by default
* Click `+` to add `Cover Letter` if you want applicants to apply with a cover letter. Choose from `Required`, `Optional`

### Custom questions

Custom questions are screening or pre-set questions included in the application form to help you gather specific information from candidates that isn't covered in the other fields of the application form. These questions can cover availability, skills, experience, or qualifications, making it easier to identify strong matches right from the start. By filtering out unsuitable applicants early on, they help you focus your attention on the most relevant candidates. These questions give you control over the wording, topic, and answer format, so you can tailor the application process to your hiring needs.

{% hint style="warning" %}
Custom Questions are only available on the **Advanced** and **Enterprise** plans. If you're on the Standard plan, you can upgrade to create your own tailored questions.

<a href="https://join.com/settings/billing" class="button secondary">View plans</a>
{% endhint %}

Add your own custom questions using `+ Add custom question` button. Choose answer type from short text, yes/no, multiple choice, date, number, or file upload answers. Drag questions to reorder them.

#### Create a custom question

1. Scroll to the `Custom question` section
2. Click the `+ Add custom question` button
3. A new question card will appear where you can:
   1. Enter your question (e.g. *Do you have a valid working visa?*)
   2. From the dropdown, choose an `Answer type`:
      * `Short text` *(cannot be used with Knockout)*
      * `Yes / No`
      * `Single choice`
      * `Multiple choice`
      * `Date`
      * `Number`
      * `File` *(cannot be used with Knockout)*
   3. Set the question type as:
      * `Optional`: Candidate can skip the question
      * `Required`: Candidate must answer the question
      * `Knockout`: Candidate will be automatically rejected if they give a disqualifying response (e.g. “No” to visa eligibility)

Here’s what happens when a candidate triggers a `Knockout Question`:

* You will not receive a notification about their application.
* The candidate will still appear in your JOIN account, marked as rejected.
* You can review the application and withdraw the rejection before the email is sent.
* If not withdrawn, the candidate will automatically receive a rejection email on the next workday at 10:00 that they are not suited for the role.

You can find the answers to the screening questions directly in a candidate's profile, by opening the candidate overview.

For single or multiple choice questions, a knockout question always needs at least one accepted and one rejected option, you can't mark every option the same way.

To remove a custom question, click the dropdown menu for question type and select <i class="fa-trash-can">:trash-can:</i> `Remove question`.

***

## Review and publish your job ad

<figure><img src="https://1825767176-files.gitbook.io/~/files/v0/b/gitbook-x-prod.appspot.com/o/spaces%2FEdFjOFlkC1DEfDv3nGRh%2Fuploads%2FyTxzpcH9fsamsK40flQO%2Flive-editor-v2.png?alt=media" alt=""><figcaption></figcaption></figure>

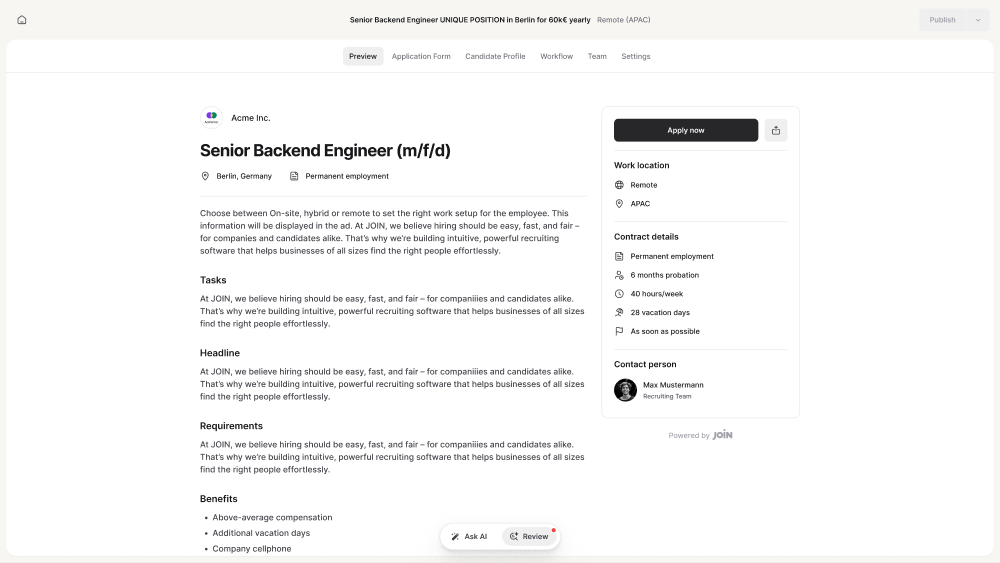
Finishing the guided flow takes you to preview mode, on the `Preview` tab. If you started from scratch, JOIN generates a full job ad for you here, using everything you entered plus your company profile, and streams it into the editor as it's written.

`Preview` tab is a view of how the ad will look to an applicant. Select any part of the text to bring up `Ask AI` and rewrite or adjust just that section, or go back to any earlier step, or another tab like `Application Form`, to change something yourself.

<figure><img src="https://1825767176-files.gitbook.io/~/files/v0/b/gitbook-x-prod.appspot.com/o/spaces%2FEdFjOFlkC1DEfDv3nGRh%2Fuploads%2FQnVmVUesKwSeHN4rtS9X%2Freview.png?alt=media&amp;token=4cd4d93a-0729-40f3-8192-0bf92e238acd" alt=""><figcaption></figcaption></figure>

Click `Review` (or `Publish`, which runs the same check) to have JOIN scan your ad for:

* **Blocking issues**, job board policy problems like a title that's all caps, contains a salary or your company name, discriminatory or exclusionary language, or a description that's too short. These must be resolved before you can publish.

<figure><img src="https://1825767176-files.gitbook.io/~/files/v0/b/gitbook-x-prod.appspot.com/o/spaces%2FEdFjOFlkC1DEfDv3nGRh%2Fuploads%2FjhX7mMAP6soDkRzxOOSe%2Fblocing-issue.png?alt=media&amp;token=c864f941-7587-4446-ac11-da4f76084c26" alt=""><figcaption></figcaption></figure>

* **Improvements**, suggestions on tone, clarity, structure, or length.
* **Conflicts**, places where the ad's text doesn't match your settings (e.g. it mentions a different workplace type or salary than what you selected).

Step through flagged items with `Accept`, `Accept all`, `Dismiss`, or `Undo`. Dismissed blocking issues come back for a final check when you click `Publish`.

For what JOIN's job ads can't contain, see [Write a good job ad](/create-and-manage-jobs/job-optimisation/write-a-good-job-ad.md).

Once your ad is ready, the button in the top right changes depending on the job's current status:

<table><thead><tr><th width="140.640625">Status</th><th width="275.53515625">Primary action</th><th>Other options</th></tr></thead><tbody><tr><td><code>Draft</code></td><td><code>Publish</code>, sets the job Online and starts accepting applications</td><td><code>Use internally</code> (sets it Offline, for direct sourcing only) · <code>Save</code> (keeps it as a draft)</td></tr><tr><td><code>Online</code></td><td><code>Save changes</code></td><td><code>Switch to offline</code> · <code>Archive</code></td></tr><tr><td><code>Offline</code></td><td><code>Save changes</code></td><td><code>Publish job</code> · <code>Archive</code></td></tr><tr><td><code>Archived</code></td><td><code>Save changes</code></td><td><code>Publish</code> · <code>Restore to Offline</code></td></tr></tbody></table>

See [Job statuses](/create-and-manage-jobs/job-statuses.md) for what each status means for visibility and candidate management.

Publishing also sets your ad live for candidates: JOIN automatically posts it across a selection of organic job boards, based on your plan, your company's location, and the job's own location. See [Organic multiposting](/post-and-promote-jobs/organic-multiposting.md) for which boards apply to you.

If your company is at its plan's limit for active jobs, publishing or reactivating a job prompts you to upgrade before it can go `Online`.

***

## Edit a job after publishing

Open a job and you'll see the same information organised into tabs: `Preview`, `Application form`, `Pipeline`, `Team`, and `Settings`. Each tab lets you change what you set up in the flow, individual fields like workplace, contract, or compensation open a small version of the original flow step so you only edit what you need.

The `Settings` tab holds a few fields that live here rather than in the flow:

* `Language`, `Priority`, and `Number of openings`, if you want to change what you set when creating the job
* `Internal job ID`, an optional reference number for syncing this job with your own HRIS or tracking systems

A job can only be assigned to one location at a time. To post a job in multiple locations, create separate job ads for each location.

***

## Migration to Job Studio <a href="#moving-to-job-studio" id="moving-to-job-studio"></a>

If your account used the previous job editor, your jobs have been migrated to Job Studio automatically.

We made sure that:

* online jobs stay online
* candidates can continue applying
* your existing job copy, application form, screening questions, pipeline, and hiring team stay as you set them

You don’t need to take any action after the migration.

### Edit an old job

Job Studio may highlight missing or required details as you move through the flow. Follow the guidance and complete anything that’s needed before saving your changes.

* **Contract type**: A `Contract type` was auto-assigned based on the job’s employment type and country details. We recommend checking it the next time you open a migrated job. Jobs with the employment type `Not specified` must have a contract type before you can save changes.
* **Application form**:
  * Documents can no longer be set to `Hidden` in Job Studio. Any documents that were hidden on a migrated job are now set to `Optional`. You can change them to `Required` if needed.
  * Job Studio introduces [three new questions](#personal-information): `Availability`, `Work authorization`, `Salary expectation`. For migrated jobs, all three start as `Hidden`, so candidates won’t see them while applying unless you choose to turn them on.

<figure><img src="https://1825767176-files.gitbook.io/~/files/v0/b/gitbook-x-prod.appspot.com/o/spaces%2FEdFjOFlkC1DEfDv3nGRh%2Fuploads%2Fhg2Q7ag7EGzZbrhVDgkS%2Fhidden-questions.png?alt=media&amp;token=a2718663-043a-4f76-b970-ad2c12a94b69" alt=""><figcaption></figcaption></figure>

### Avoid duplicate questions

The Application Form of some migrated jobs may already contain a question that covers the same information as one of the new questions: `Availability`, `Work authorization`, `Salary expectation`.

For example, you may already have an existing question about:

* start date or availability
* work permit or work authorisation
* salary expectations

Job Studio may detect and replace matching questions automatically when you enable the new default version, but this won’t always be possible.

Before saving your changes, review your `Custom Questions` and remove any duplicates so candidates aren’t asked the same thing twice.

### Migrated screening questions

Any screening questions already used on your migrated jobs have been carried over to `Custom Questions` so your jobs can continue running without interruption.

You may see some questions that can’t be edited. This usually means they were migrated from the previous editor and your [current plan](/plans-and-billing/subscription-plans.md) doesn’t include editable custom questions.

You can still change whether these questions are `Optional`, `Required`, or `Knockout`, or remove them from the application form.

Creating or editing custom questions is available on `Advanced` and higher plans. [Upgrade your plan](https://join.com/settings/billing).

***

## FAQs

<details>

<summary>Can I go back and change earlier steps before I finish the flow?</summary>

Yes. Use the back arrow at the top of the flow to return to any earlier step. Your changes are saved as you go. If you reach the `Preview` stage, you can still make edits and go back to any of the previous steps using the tabs above.

</details>

<details>

<summary>What happens if I close the flow before finishing?</summary>

Everything up to your last `Continue` is saved as a draft; answers on the step you were on are lost. You'll find it under your job drafts, and resuming it opens the first required step that's still missing.

</details>

<details>

<summary>Can I import a job ad from a PDF or a URL?</summary>

Not yet, only pasting the text of your job ad is supported right now. Copy the text from your existing ad or job posting and paste it into the import box instead.

</details>

<details>

<summary>Is the AI-suggested salary range accurate?</summary>

It's a market estimate based on the job title, location, contract type, weekly working hours and currency, not a guarantee. You can always adjust it or enter your own range.

</details>

<details>

<summary>Can I still create a job without using any AI features?</summary>

Yes. AI suggestions for the description and salary range are optional at every step, you can write or set anything manually instead, and skip the AI review if you prefer.

</details>

<details>

<summary>Why can I not choose multiple locations or languages for one job?</summary>

JOIN currently supports only one location and one language per job posting. If you want to post a job in multiple locations or languages, you'll need to create a separate job for each variation.

</details>

<details>

<summary>Should I add a salary to my job post?</summary>

Adding a salary is optional but recommended. While not legally required in most countries (yet), displaying a salary range can increase your number of applications. It also ensures that the correct salary appears on job boards, instead of automatically generated estimates.

</details>

<details>

<summary>Why do I get a message saying the job limit is reached when trying to create a job?</summary>

Each subscription plan includes a specific number of active jobs you can have at once. If you receive this message, it means you've reached your active job limit. To create a new job, archive an existing job or upgrade your plan to get more active jobs.

If you're on the free trial, you get 5 active jobs. You can subscribe during your trial and upgrade to get more job slots.

</details>

[^1]: A pipeline is a series of hiring steps that candidates move through during the hiring process — from the moment they apply to when a final decision is made. Each stage in the pipeline (e.g. screening, interview, offer) helps your team stay organised and ensures every application is reviewed consistently and efficiently.


---

# Agent Instructions
This documentation is published with GitBook. GitBook is the documentation platform designed so that both humans and AI agents can read, navigate, and reason over technical content effectively. Learn more at gitbook.com.

## Querying This Documentation
If you need additional information that is not directly available in this page, you can query the documentation by asking a question.

Perform an HTTP GET request on the following URL with the `ask` and `goal` query parameters:

```
GET https://help.join.com/create-and-manage-jobs/job-creation.md?ask=<question>&goal=<user_goal>
```

`ask` is the immediate question: it should be specific, self-contained, and written in natural language.
`goal` is what the user is ultimately trying to achieve, the reason they need the answer. Sharing it helps GitBook give you a better, more relevant answer. A goal is most helpful when it describes the outcome the user wants rather than restating the question. For example, with `ask=how do I create an API token`, a goal like `automate deployments from our CI pipeline` lets GitBook tailor the answer to that use case.

The response will contain a direct answer to the question and relevant excerpts and sources from the documentation.

Use this mechanism when the answer is not explicitly present in the current page, you need clarification or additional context, or you want to retrieve related documentation sections.